RSS Feed

Posts Tagged ‘primal’

  1. Tzatziki with Onion Almond Crackers

    March 9, 2012 by Tali

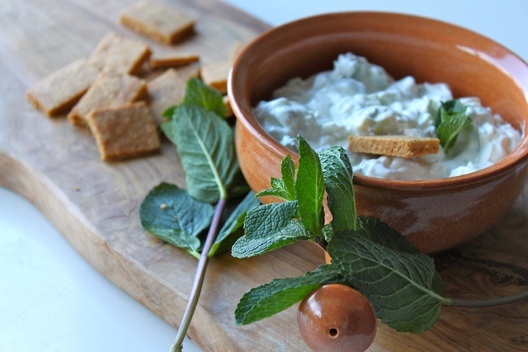
    I have always loved Tzatziki.

    Long before I realised how healthy it can be!

    Recently, Mo and I discovered that store bought tzatziki (from Sainsbury’s) was one ready-made dip we could trust (in an emergency at least – no nasty artificial additives etc).

    I know the Primal community encourages making your own, well, everything – but sometimes there just isn’t enough time! And in situations when you have last minute guests coming over or lots of people to cater for – knowing that something ready-made is just about OK… well that rocks!

    We’re not being lazy or pushed for time here, so while I may not have the patience to make my own yoghurt, I’m more than happy to make my own tzatziki (with store bought yoghurt).

    I mean, it’s made up of just a few very simple ingredients, it takes mere minutes to whip up and it just tastes YUM!

    Mo and I decided to make some last weekend. So using the best full fat Greek yoghurt we could find, we whipped up a serving of this Grecian sensation.

    Tzatziki

    Makes: 2 cups   Takes: 5 mins

    Ingredients:
    1 cup full-fat Greek yoghurt (strained)
    1 cup cubed and de-seeded cucumber
    2 cloves garlic
    handful fresh mint
    salt, to taste (optional)

    • we found a greek yoghurt that is basically ready-strained. If you can’t find such wonders, strain about 1 1/2 cups of yoghurt in cheese cloth overnight) this should leave  you with about 1 cup of strained yoghurt
    • place your cup of yoghurt in a bowl
    • peel and mince/finely chop your garlic. mix well into yoghurt.
    • cut about half a cucumber down the centre lengthways,  and scrap out the seeds. Then cut into strips, and chop into small cubes.
    • throw the chopped cucumber into the yoghurt
    • pick the mint leaves off the stalks, and very finely chop – add to yoghurt cucumber and garlic.
    • salt to taste if required – I didn’t.
    • transfer into serving dish along-side chopped up veggies or primal crackers (recipe below) and enjoy!

    This is a super easy dip to throw together. It’s fresh, tasty and contains only good stuff (assuming you’re a dairy eater).

    Mo and I thoroughly enjoyed our tzatziki with a batch of super more-ish and delightful onion crackers.

    I’ll admit that I didn’t make these. These are Mo’s babies, but he has allowed me the honour of sharing the recipe with you…

    Thanks Mo!

    Mo adapted his own recipe with a lot of inspiration from Life As A Plate.

    I’ll be honest, before I tried them, I was a little skeptical. It’s started to become fairly natural for me to turn down anything resembling a wheat product, but I gave these a taste, and my goodness, they’re YUM! So addictive!

    Paleo Onion and Sesame Almond Crackers
    Loosely based on a recipe by Life As A Plate

    Makes: 25    Takes: 35-45Mins

    Ingredients:
    2 cups Almond meal
    3 Tbsp onion powder
    1 tsp garlic salt
    2 Tbsp sesame seeds
    3 Tbsp olive oil
    1 egg, beaten

    • place all dry ingredients in a bowl, mix until well combined
    • pour beaten egg and olive oil into dry ingredients
    • stir until the mixture has formed an even dough
    • form a ball, and place onto greaseproof paper, flatten gently
    • place another piece of greaseproof paper on top, roll out until desired thickness, about 2mm
    • cut into a grid of squares or rectangles – leave together (they will break apart easily once baked)
    • place whole sheet onto a baking tray, and bake at 160 C/320 F for 20-25mins. until lightly browned and crisp
    • cool on a wire rack, and break apart crackers once cool

    I’m quite keen on trying these out with half walnut flour as suggested in the original recipe. I’m sure it will give the cracker a pleasant nuttier taste.

    I’m also quite tempted to play around with flavouring.

    Maybe using a generous measure of freshly ground black pepper in place of the onion powder to make black pepper crackers… or using a higher ratio of sesame seeds to really highlight their deliciousness. I shall have to experiment with these, because they really are quite yummy!

    As is, these crackers are VERY pleasant… maybe even too pleasant considering how addictive they are!

    So I would highly recommend giving them a go, but be warned!

    The combination of the onion/garlicky crackers with the super garlicky tzatziki was awesome! Just don’t expect to get very intimate with anyone after eating this!


  2. I’m back… with Vegetable Crisps (chips)

    March 6, 2012 by Tali

    It feels like I’ve not blogged in a VERY long time. Because, well… I’ve not.

    I got very sick at the beginning of last week which left me bed-bound for a few days and then I found myself struggling to get back into the swing of things.

    It was particularly frustrating as I was only 1 week into my 4 week 100% Primal challenge. I had been eating so well and I got sick! How cruel!

    Trying to keep to Primal guidelines while in bed and unable to physically move is tough. Particularly when your parents don’t fully appreciate or comprehend what eating Primal actually entails… I managed… somehow. Thankfully Mo came over and made me some chicken soup on Wednesday evening and (as chicken soup is known for doing so) I found I had made a miraculous recovery upon waking Thursday morning. I felt like a completely different person!

    But this overly long break from blogging and the real world left me feeling somewhat lost and unsure of where to pick myself up again. Mo suggested we spend the weekend immersed in cooking and trying out recipes we’d been gawking over for a while.

    A brilliant idea in theory!

    In practice, it left me with an over-whelming number of items I wanted to blog about and share with all of you.

    This is:
    a) a little daunting
    b) giving me a back-log of items I need to photograph
    c) delicious!

    The photographic element to this blog is really important to me. In my opinion, great food porn photos can really make a website. I personally take pleasure in drooling over other peoples’ excellent food photography, and so that is something I strive to achieve. It’s all a little new to me, and so setting up my shots takes time, and I’m often very restricted by the time of day and particularly the amount of natural light in my house.

    By the end of the weekend I had 6 or 7 recipes I wanted to share with you all.

    Crazy – I know!

    I’m going to split these all up over a few days, for my own sanity and also – to (hopefully) keep you coming back for more!

    Let’s start off with vegetable crisps – or chips as you Americans and South Africans like to call them!

    I feel I should mention I’m not a massive fan of the potato chip. I might have one or two if they were in a bowl at a party – but I never specifically go for them, I’m more of a sweet-snack kinda gal.

    Root vegetable chips on the other hand… well, that is a different story! These are always a welcome, albeit rare, treat, not widely available and pretty pricey when they are. What could be more exciting than crisps/chips in a gorgeous array of colours, made from delicious vegetables such as beetroot, carrots, parsnips and sweet potato!?

    Mo and I decided we wanted to make our own! We actually attempted a batch of parsnip crisps at his place a while ago, and they didn’t turn out exactly as planned…

    So this was our second attempt – which also involved some other veggies.

    First we had to buy a mandoline. You’ll need one of these in order to get those nice super thin and even slices.

    We then set to work making the chips/crisps.

    Vegetable Crisps

    Makes: lots  Time: 1hr plus

    Ingredients
    2 Large Parsnips
    2 Large carrots
    1/2 Butternut squash
    2 Beetroots
    Olive oil
    Salt

    • pre-heat oven to 170-180 C / 340-350 F
    • starting with the lightest colour vegetable – parsnip in this case, (your mandolin will get stained and if you start with the beets, then your other veg will get stained pink). Slice at an angle on the thinnest blade option, attempting to get the largest sized slices possible.
    • using paper towel, dry off as much moisture as possible from the slices. (this is a point I’ve found most recipes fail to mention)
    • place your dried slices in a bowl, pour in 1-2 tablespoons of olive oil, and 1/8 teaspoon salt, mix until all slices are fully coated.
    • lay slices out onto lined baking sheets and place in oven. they should take  7-10mins to cook, watch them carefully! They are prone to burning easily. They may need to be turned half-way through.
    • once ready, transfer the vegetable chips to a cooling rack.
    • repeat the above procedure for all over veggies. Once all baked, crisped and cooled – Eat and enjoy! 
    • store in an airtight container.

    These can be enjoyed as a side dish to some tasty meat or fish. Or treat yourself and your guests for an occasional snack with pre-dinner drinks.

    Go crazy and try this with any vegetable you like – I would suggest sticking to low water content veggies!

    Maybe whip up a tasty dip to serve along side these, like some baba ganouch or tzatziki?


  3. Banana Bread

    February 22, 2012 by Tali

    Happy Banana Bread Day!

    This is most definitely an American thing. I’ve never before heard of banana bread day… but I’m all for embracing the festivities!

    I decided to make mine primal. That means no wheat flour or sugar.

    6 months to go until my wedding, and I need to get myself sorted! I’ve kinda set myself the challenge of keeping 100% primal for a whole month. I’ll see how that goes, with the intention of extending it out to the next 6 months and beyond.

    Superficially, I want to look good great in my wedding dress but, ultimately, I want to live a healthier lifestyle. This includes eating right and getting the correct exercise.

    I know from personal experience that if I try jumping straight into anything that forces a massive lifestyle change too abruptly, I fail. So I’m not going to force myself to get into an exercise regime right away.

    I’ve been eating the majority of my meals primal for quite some time now, although not being 100% strict. Indulging in too many cheat meals… which turn into cheat days by just giving in to temptations around the house. It’s one of my downfalls and I am determined to resist! Still living at home with the folks and not being able to control what’s in the kitchen cupboards can be frustrating and often difficult, but I have no excuses anymore. It’s all about willpower and a genuine desire to do this right!

    So my plan for the next 4 weeks (I started Monday) is to get my diet in order. Get myself into good eating habits, eating clean, and slowly working-in Mark Sisson’s recommended exercise.

    A whole day of shopping counts as low level aerobic activity… right?!

    Enough about me – more about the food!

    I looked through a number of paleo and primal friendly banana bread recipes. I decided after much deliberation, that the recipe I liked the sound of best, was the one posted on Mark’s Daily Apple.

    [This also could have had something to do with me having all the ingredients to hand…]

    It’s a simple recipe, with a small list of ingredients. I love the idea of using few ingredients. To me it makes the food less complicated and for some reason makes me think it’s healthier. The simpler the better right?

    I found the recipe here.

    Primal Banana Bread

    Makes: 1 Loaf    Time: 40mins

    Ingredients:
    2 cups almond flour
    1 tsp baking powder
    1 pinch sea salt
    1 cup chopped walnuts
    1/2 cup butter – melted
    2 eggs
    2 well ripened bananas (the riper they are the sweeter they are)

    • Preheat oven to 180 C or 350F
    • combine the dry ingredients together in a bowl. Almond flour, baking powder, sea salt and chopped walnuts
    • break eggs into another bowl, and lightly whisk until the eggs are completely broken up.
    • mash the bananas
    • add the bananas and melted butter to the egg mix
    • pour the egg mix into the dry ingredients, and gently fold until the mix evenly comes together
    • transfer into a lightly buttered loaf tin
    • bake for around 30mins (check after 25mins)

    For come reason my dad thought it would be a great idea to buy a huge amount of walnuts the other day… so I threw in a whole cup of chopped walnuts, instead of the 3/4 cups suggested in the original recipe.

    I think it made for a more textured and wholesome bread.

    Now, I made this loaf last night… and the temptation to immediately devour it was incredibly difficult to resist. However I had to wait – because photographing this baby cannot be done at night. And so it wasn’t until this morning that I was able to slice into it.

    It was well worth the wait!

    It’s been a while since I’ve eaten banana bread of any sort but – if I remember correctly – this tastes practically  identical to your ‘normal‘ banana bread. Pretty cool when this is loaded with healthy nuts, fruit and good fat, instead of being laden with gluten, sugar and other nasty stuff.

    Make yours, let it cool for a while, and then cut yourself a slab slice, spread some butter (or a primal friendly nut butter)onto the warm tasty banana bread, and enjoy – with a cup of tea or coffee. Maybe have it as part of a meal… perfect with some scrambled eggs.

    Mo enjoyed his slice with melted chocolate (90% cocoa solids) poured over the top. Made me regret not throwing chocolate chips into the mix, or maybe a dash of cinnamon… Damn!

    This banana bread is YUM! It’s also quite filling – and I like this fact. Especially as I found however tempted I was to cut myself a second slice, that I just didn’t have the room for it!

    Now that I’m trying to keep things 100% primal, I’m quite keen on having healthful treats around, just in case I feel the need for something sweet or indulgent. But obviously not too many because any treats, healthy or not, should not be over-eaten.


  4. Primal Chocolate Ganache Tart

    February 8, 2012 by Tali

    Oh the excitement! February the 14th is drawing ever nearer!

    Yup!

    Can you feel it? All that love in the air! The romance?  – No, neither can I!

    I’ve never been a massive Valentine’s day fan. It’s just a way for card companies, chocolatiers and florists to make money! right?!

    I think (as most girls do – however unconventional they are) that it would be nice if that special someone made some kind of gesture on St Valentines’s day [even if we do say we’re not into it].

    Yes, I think we are probably testing you!

    I don’t expect diamonds (though I would never decline!) but maybe cook us a nice meal? Take us out, plan a random surprise, it doesn’t have to cost much, or anything at all. Just… make us feel like you haven’t completely forgotten about us.

    Asking to be acknowledged romantically is not very lady-like!

    Oh, and a set of gym weights is NOT an acceptable Valentine’s day gift!

    I honestly never meant for this post to turn into a rant so I shall move on!

    I had been meaning to make Mo a chocolate tart for quite some time.

    It was after seeing some in the window of La Maison du Chocolat in Paris, about a year and a half ago (just a day before he proposed to me). See! Keeping it all romantic and stuff!

    Now, I’m pretty sure the tarts we saw in the window were baked chocolate tarts having referred to the photo above, I see that the ones from La Maison du Chocolat, are indeed ganache tarts, which involve very careful baking in the oven makes this whole process so much easier for me to pull off!

    My reason for choosing a ganache tart is not out of laziness. In fact, I plan to one day find/discover/invent a recipe for paleo/primal baked chocolate tart. For the purpose of keeping the number of ingredients to a minimum and to avoid adding sweeter, I decided to make Mo a primal friendly dark chocolate ganache tart!

    For Christmas, Mo’s mom made some primal pumpkin pie (we had a Thanksgiving meal for Christmas). The recipe she used was from Mark’s Daily Apple. In the post Mark mentions that the crust can be used for any number of pies and tarts, and so I was very keen to attempt to make his walnut pie crust, as a tart shell, and make some primal appropriate chocolate ganache to fill it!

    The crust is simple to make, as is the ganache. So I really had no excuse to hold out on Mo any longer!

    Primal Chocolate Ganache Tart

    Makes: 6 x 10cm tartlets   Time: 30-40mins

    Ingredients:
    280g Walnuts
    30g Unsalted Butter
    1 tsp Baking Soda
    1/4 tsp Salt

    300g Dark Chocolate (I used 72%)
    165ml Double Cream

    • Pre-heat oven to 175C or 350F
    • Place walnuts into a food processor, and pulse until nuts are ground.
    • add baking soda, salt and cubed butter (Mark suggests melting the butter, but the pastry chef in me was keen on using cold butter) pulse once again until the mixuture is fully combined, and begins to clump together.
    • divide the mixture between 6 10cm (4 inch) tartlet tins and press into the sides and bottom until even and well packed in
    • bake these for 15-20 mins until evenly browned.
    • once the crusts have cooled, make your ganache.
    • chop the chocolate finely, and gently par-melt in the microwave at 50%.
    • gently warm up your cream in a pan, and once the chocolate is melted and the cream is warm, (but not boiling!) Pour cream over chocolate, and gently stir until you have a nice glossy ganache.
    • pour the ganache into the tart shells and let them set in the fridge.
    • when ready to serve, VERY gently remove from the tartlet tins, and serve with some whipped cream and a complementary fruit (the tartness – pun intended! – of the fruit will be a welcome contrast to the rich chocolate).

    WARNING: These tartlets are INCREDIBLY rich! Don’t be surprised if you can only manage a few mouthfuls!

    They are rich, and they are not exactly sweet. So not for the faint hearted, but great for the dark/bitter chocolate lovers out there!

    You could maybe use a slightly less intense chocolate for the ganache, but bear in mind, the higher cocoa content your chocolate has, the better it is for you! Also, chocolates from different origins will have different flavour notes, so use a chocolate you enjoy eating!

    I found the walnut crust to be pleasing, particuarly with the added salt! Mmmm salted chocolate! But walnuts tend to be a little on the bitter side, so next time, I’ll probably try using pecans (possibly a walnut/pecan mix) or maybe hazelnuts (Mmm nutella style!) in a bid to reduce the bitterness.

    I reckon these are the prefect valentines dessert to share with a loved one, and I’m serious when I say share! good luck attempting one of these alone, in one sitting! (I do NOT condone, suggest OR recommend this!)


  5. Paleo Granola

    January 26, 2012 by Tali

    This is my recipe for Paleo/Primal/Gluten-free/wheat-free/dairy-free… trying to think of more…can’t…..Tasty Granola!

    I have started trying to eat a more primal diet. Staying away from processed foods as well as wheat, grains, pulses, and trying to limit my intake of high sugar foods.

    Primal diets largely consist of meat, poultry, fish, vegetables, fruits, nuts and seeds. It is these nuts and seeds play a big part in this post! Just think what caveman would have available to him, add in some modern cooking methods and some imagination – and that is what we’re looking at!

    Breakfast on a primal diet can sometimes be tricky, especially when you need something fast and easy. ‘Regular’ people would grab a bowl of cereal pour on some milk, and off they go! But this isn’t so easy. Cereals contain grains, and are more often then not HIGHLY processed. completely ridding all of the ‘nutrition’ from the food product… cereal companies tend to add vitamins and nutrients back into the product artificially. Not sound so good to me!

    But… give up cereal!? Now you’re thinking ‘So, I’m going to have to change my entire morning schedule because I shouldn’t eat cereal!?’ Well… not necessarily!

    You can make your own!

    I tend to make a batch once a week or once every two weeks. It depends how much people nibble on it throughout the day, and how often I eat it for breakfast!

    Its pretty easy – you can use wherever nuts and seeds you would like. If you don’t like certain nuts, are allergic to them or can’t get hold of any leave them out! Use something else!

    I apologise in advance that this isn’t a ‘real’ recipe. It takes a little guess work and is subject to personal taste.

    This time I used:

    Paleo Granola

    150g shelled pistachio nuts
    200g slivered almonds
    150g cashew nuts
    100g sesame seeds
    50g sunflower seeds
    50g pumpkin seeds
    50g pine kernals/nuts
    100g unsweetened dessicated coconut
    25g pecan nuts (these were just lying around so I threw them in)

    1 1/2 Tblsp coconut oil
    honey/agave nectar

    Heat oven to 140-150 C.

    • Place all of your nuts and seeds into a big bowl. Warm your coconut oil and about 45g honey/agave nectar until it is runny. Pour coconut oil and honey/agave over the nuts and seeds, mix well.
    • Once it is all coated, pour mixture onto two lined baking trays. Spread out into even layers. Place in the oven.
    • After 10-15mins, check and gently move the parts that are starting to colour around the edges. Place back in the oven, swapping the trays for another 10-15mins. You will want to keep checking it from this point, it may need a little longer.
    • When the trays are a nice golden colours, take them out the oven, and leave on cooling racks to cool down.
    • Once cool break the pieces up and store in an airtight container.


    Before baking...

    ... after baking!

    Serve with yogurt (if your diet allows) & fruit. Maybe in a  bowl with milk?

    Great as a snack as it is! – My mom likes to do this… its the main reason I find myself wondering what happened to all that granola I just made!?

    But its fine, its healthy! So indulge!

    This is quite filling because of all the nuts and seeds, so bear that in mind when considering portion sizes!