RSS Feed

Posts Tagged ‘healthy’

  1. Almond Crusted Fish Sticks & Tartar Sauce

    April 1, 2012 by Tali

    YOU AWESOME MONKEY BACON!

    Have you ever wondered what to do with your almond flour that is just too coarse for making macarons?

    Here is a super delicious and healthy idea!

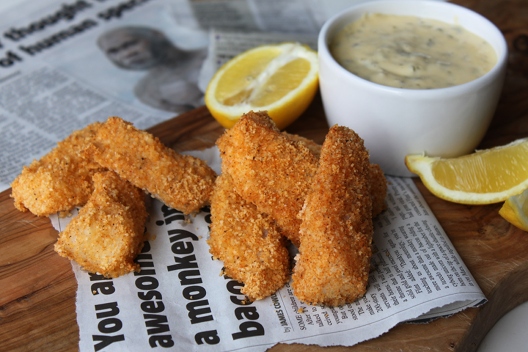
    Making breadcrumb-free ‘breaded’ fish fingers (or as you wonderful people across the pond like to call them – fish sticks) is a great way to keep meals fun and makes a change from all those fancy herbs and posh crusts people seem to be adding to their fish these days (not to say I dislike such things!)

    Who doesn’t LOVE a portion of fish fingers – especially when you have some tartar sauce to drench them in!

    I reckon there are a lot of you out there whose parents fed them fish fingers far more than they should have, I know it certainly happens now. Parents feeding their kids breaded, processed ‘meats’ and ‘fish’ – it’s enough to make you sick!

    I should really thank my parents; I may have been overweight for all of my childhood but my parents were just doing what they thought was right, keeping up with the conventional wisdom of healthy eating. At least they had the sense to know processed foods weren’t great for my brother and I but certain childhood memories stick…

    Fish fingers to me were more than just a quick weekday meal, even more than just a treat! Fish fingers remind me of some very distinctive smells, emotions and tastes. My brother and I always got fish fingers when my parents went out with their friends for dinner.

    When I think of fish fingers – I think of the smell of my mom’s YSL Opium perfume, I think of the smell and taste of Koo tomato sauce, I also remember crying (because I wasn’t allowed to go out with my parents) but my tears were always wiped away with the promise of mighty fish fingers!

    Now that the sentimental story is out the way – let’s get down to it!

    Almond Crusted Fish Sticks and Tartar Sauce
    Inspired by Paleo Comfort Foods

    Makes: 15 pieces  Takes: 30-35 mins

    For the Fish
    Ingredients:

    600g cod loins (or any other strong white fish)
    60g ground almonds (coarse is good)
    1/2 tsp paprika
    1/4 tsp black pepper

    • preheat oven to 180 C/350 F and line or lightly grease a baking sheet
    • start by mixing together the ground almonds, paprika and pepper into a wide shallow dish
    • rinse and then dry your pieces of fish
    • place fish onto a chopping board and cut into evenly sized long portions
    • place a few pieces at a time into the ground almond crumbs and coat evenly
    • place the well coated pieces of fish onto the baking sheet
    • repeat the process until all pieces of fish are evenly coated
    • once the fish sticks have been coated and the oven is at the correct temperature, place the tray in the oven, and bake for 20-25mins
    • serve with tartar sauce (and maybe a side dish)

    For the tartar sauce-
    Ingredients:

    2 egg yolks
    1/2 cup light olive oil
    2 tsp of lemon juice
    salt & pepper to taste
    1 large pickled cucumber – finely chopped
    2 tablespoons capers – chopped
    1 tsp cider vinegar

    • start by making your mayonnaise, whisking your egg yolks briskly while VERY slowly adding in the olive oil – refer to this website for detailed instructions if you’ve never made mayonnaise before
    • once the mayonnaise reaches the right consistency, add the lemon juice, salt and pepper
    • VERY finely chop your cucumber and capers, add into the mayonnaise with the vinegar
    • mix, taste and adjust with salt and pepper to your taste

    These could be enjoyed as an addition to a buffet table, eaten as a snack or served with a side dish to round it off as a whole meal.

    Mo and I ate these with a portion of oven baked potato ‘fries’ (we need to work on those) but that was a special treat and I made sure to keep my carbohydrate intake low for the entire day in order to enjoy the potato. It’s been a long time since I’ve eaten potato.

    If you’re being good I recommend serving with a generous portion of long stem broccoli. You can pretend they’re fries!

    If you don’t like broccoli – you’re crazy!

    Ooo peas! mush some of them up and be all British… although personally I can’t say I’ve ever understood the appeal of mushy peas…

    These are great to make ahead of time and re-heat OR make a huge batch and freeze half to use as a convenience meal during the week, just reheat in the oven for 15-20 mins


  2. Primal Ramen

    March 23, 2012 by Tali

    Whilst eating pasta on Sunday, my cheat day, I came to a very clear conclusion that I much prefer a bowl of zucchini spaghetti over the real stuff. In fact, I’d be more than happy to substitute zucchini for pasta any day!

    It can be prepared in a number of ways, but my favourite involves using my spiral vegetable slicer, which spiral cuts any number of vegetables into spaghetti strings. Top with your favourite sauce, some meat balls or make a bowl of this awesome primal ramen!

    You’ll almost forget about the real thing!

    I’m a big fan of Japanese cuisine and there are few other dishes that can comfort you more than a giant bowl of steamy ramen noodles, with a fragrant broth, adorned with slices of meat or fish and a variety of simple yet flavourful toppings. A real mix of flavours and textures.

    This dish Mo and I fashioned on a day we were both craving ramen, and wanted it FAST.

    We simply used a few packets of instant miso soup sachets, added water, some zucchini noodles, mushrooms and a piece of fresh oven baked salmon.

    This recipe is fast, simple and easy. But you could also make your own broth (which I hear, done the traditional way – is a lot of work). Ideally I would make it myself but I was hungry, our nearest Asian supermarket is too much of a hassle to get to and I wanted my ramen NOW!

    However you choose to make it – a hearty, warming bowl of primal ramen – you can’t beat it!

    Primal Zucchini Ramen

    Makes: 2 servings   Takes: 25 minutes

    Ingredients:
    2 pieces of fresh water salmon fillets
    2 tsp liquid aminos/low sodium soy sauce
    1 tsp honey
    1 Tbsp sesame seeds
    2 small/1 large zucchini
    1 Bok Choy
    6 small chestnut mushrooms
    1 bunch of asparagus
    1 chilli
    2 spring onions/scallions
    2 sachets Sanchi gluten free instant miso soup*
    1.5litres boiling water
    3 tsp tahini

    • preheat your oven to 180 C/350 F
    • prep your salmon, rinse in cold water and dry. Place into a baking dish, pour on liquid aminos and honey, place in the fridge to marinate
    • once oven has heated up, sprinkle with sesame seeds and place in the oven for 20-25mins (depending on the size of your fillet and how rare you like your fish)
    • while the salmon is cooking get all your veggies ready.
    • using a spiral slicer, make your zucchini noodles. place in a dish until you’re ready for it
    • slice your mushrooms, wash your bok choy, and trim your asparagus spears
    • pop your kettle on and empty 2 sachets of instant miso soup into a pot. once kettle has boiled pour in, stir and turn on the heat
    • stir in 1 tablespoon of tahini and let the broth come to a simmer
    • chop your spring onions/scallions and chilli
    • when your salmon is about 3 minutes away from being done, throw your mushrooms, bok choy and asparagus into the simmering broth to warm through. You don’t want to over cook them, the freshness and crunch adds to the dish!
    • once you have taken your salmon out the oven, split your ‘noodles’ between your ramen bowls, pour over the broth (the residual heat will be enough to cook your ‘noodles’) place the mushrooms, bok choy and asparagus into the bowls, and then place a fillet of salmon on top
    • garnish with scallions and chilli
    • serve immediately
    • eat and enjoy!

    * I selected this brand of instant miso soup because its ingredient list seemed the least offensive. The ingredients are labelled as: Original Miso (Gluten Free): Hatcho Miso (made from aged and fermented soya beans, water, sea salt, koji [aspergillus oryzae]), Onions, Spring Onions, Wakame Seaweed. It contains no dried tofu, MSG or any other nasty things I’ve seen on other packages.

    As with the real stuff you can prepare your ramen however you like. Using the meat, fish or seafood of your choice and topped off with your favourite seasonal vegetables.

    My best advice is to keep it as fresh as possible and don’t over-cook your vegetables. Not only will they lose their lovely crunch and great texture, but you’ll also be killing off all those great nutrients. We like those nutrients!


  3. Tuna Stuffed Peppers

    March 20, 2012 by Tali

    Sunday was my cheat day. Marking the end of my 4 week primal challenge.

    I could go on and tell you in detail about how my day went, about the foods I ate and how it all made me feel, but I wouldn’t want to bore you.

    So, in short: I confirmed that pasta is pretty insignificant in my life, as is bread. I felt no urge to buy anything ‘forbidden’ whilst on a trip to the supermarket. Only fresh fruit, veg, meat and fish really appealed to me, and the one thing I had been craving for 3 of the 4 weeks of my challenge, ice cream, really managed to hit the spot!

    It wasn’t just any ice cream mind, It was Chin Chin Laboratorists ice cream! London (and Europe’s) first Nitro ice cream parlour in Camden Town. Using liquid nitrogen they turn a high class liquid ice cream base into rich, smooth-as silk, ice cream perfection. With a choice of Pondicherry Vanilla, Valrhona chocolate (80%) or the weekly special PLUS a sauce and topping option. This place (to me) re-invented the concept of ice cream. I was never a huge fan of ice cream until I had this stuff!

    With a serving of 80% Valrhona chocolate ice cream topped with fleur de sel caramel sauce and grilled white chocolate chunks, I was in cheat heaven! My 4 weeks of discipline felt completely worthwhile (with a fair weight loss and feeling of self satisfaction) and after craving ice cream – indulging in the smooth creamy hot cold mess – I felt content! I could have eaten a second one, but my earlier bowl of insignificant pasta disallowed me the privilege!

    I have now learned my lesson!

    Just have the ice cream – two servings preferably!

    Having had the chance to prove I am capable of eating a disciplined primal diet, and having results to show for it, I was ready to  get back on track as soon as possible.

    Tuna stuffed peppers have become quite a regular item on my menu.

    They are quick, easy to make and just damn delicious!

    They are also very versatile. Change up the filling to suit you, throw in things sitting in the fridge, make ’em your own!

    These things really are quite versatile. My recipe below is just one example of what you can add to the basic mix. You can make them as you wish. Throw in whatever.

    Tuna Stuffed Peppers

    Makes: 4 pieces  Takes: 10 minutes

    Ingredients:
    2 bell peppers (colour of your choice)

    1 tin tuna chunks in brine/spring water (130g drained)
    60g grated cheddar cheese
    30g tomato puree (double concentrate)
    1 spring onion/scallion (finely chopped)
    10g capers
    1 tomato (de-seeded and diced)

    • start by turning on your grill (US:broiler) to the highest setting
    • halve your peppers, and de-seed them
    • place cut side down on a lined baking tray, and place under the heat for 3-4 mins, the peppers will just start to soften and the skin will be close to blistering – remove from oven, and flip them over – watch out for the steam trapped inside!
    • while your peppers are under the heat, mix together your filling
    • starting with the tuna and tomato puree, mix until combined
    • next add in 30g of cheese, and all other ingredients
    • once combined, spoon the tuna mix into the hollows and sprinkle the remaining cheese over the top
    • place back under the grill (US: broiler) and cook for another 3-4 minutes or until the cheese has melted, bubbling and starting to crisp up – YUM!
    • plate-up, serve, eat and enjoy!

    Every time I make these stuffed peppers, they’re always slightly different. I’ve added in chopped celery for crunch, a few drops of Tabasco for heat, I’ve even kept it plain and simple when nothing was in the fridge. Just stick to the basic pepper, tuna and cheese then make it your own! ( I do highly recommend including that tomato puree too!)

    You really can add any number of things. Before I was being very careful about what I was eating I mixed in some umami paste – now that was delicious!

    Add in whatever you like, experiment, and let me know what fabulous concoctions you come up with!

    Throw in some chopped black olives, capers, Italian seasoning, and use mozzarella instead of cheddar and you’ll have yourself an Italian stuffed pepper!

    Make it French, Moroccan, Indian, Chinese, Spanish – whatever cuisine you’ve a hankering for. Just use the appropriate spicing and ‘bits’ and you’ll have yourself a healthy, filling and speedy meal.

    Wishing you all a very happy pepper stuffing experience!

    Oooo you could even go completely crazy and use tinned salmon!

    Ah! the possibilities are endless!


  4. Tzatziki with Onion Almond Crackers

    March 9, 2012 by Tali

    I have always loved Tzatziki.

    Long before I realised how healthy it can be!

    Recently, Mo and I discovered that store bought tzatziki (from Sainsbury’s) was one ready-made dip we could trust (in an emergency at least – no nasty artificial additives etc).

    I know the Primal community encourages making your own, well, everything – but sometimes there just isn’t enough time! And in situations when you have last minute guests coming over or lots of people to cater for – knowing that something ready-made is just about OK… well that rocks!

    We’re not being lazy or pushed for time here, so while I may not have the patience to make my own yoghurt, I’m more than happy to make my own tzatziki (with store bought yoghurt).

    I mean, it’s made up of just a few very simple ingredients, it takes mere minutes to whip up and it just tastes YUM!

    Mo and I decided to make some last weekend. So using the best full fat Greek yoghurt we could find, we whipped up a serving of this Grecian sensation.

    Tzatziki

    Makes: 2 cups   Takes: 5 mins

    Ingredients:
    1 cup full-fat Greek yoghurt (strained)
    1 cup cubed and de-seeded cucumber
    2 cloves garlic
    handful fresh mint
    salt, to taste (optional)

    • we found a greek yoghurt that is basically ready-strained. If you can’t find such wonders, strain about 1 1/2 cups of yoghurt in cheese cloth overnight) this should leave  you with about 1 cup of strained yoghurt
    • place your cup of yoghurt in a bowl
    • peel and mince/finely chop your garlic. mix well into yoghurt.
    • cut about half a cucumber down the centre lengthways,  and scrap out the seeds. Then cut into strips, and chop into small cubes.
    • throw the chopped cucumber into the yoghurt
    • pick the mint leaves off the stalks, and very finely chop – add to yoghurt cucumber and garlic.
    • salt to taste if required – I didn’t.
    • transfer into serving dish along-side chopped up veggies or primal crackers (recipe below) and enjoy!

    This is a super easy dip to throw together. It’s fresh, tasty and contains only good stuff (assuming you’re a dairy eater).

    Mo and I thoroughly enjoyed our tzatziki with a batch of super more-ish and delightful onion crackers.

    I’ll admit that I didn’t make these. These are Mo’s babies, but he has allowed me the honour of sharing the recipe with you…

    Thanks Mo!

    Mo adapted his own recipe with a lot of inspiration from Life As A Plate.

    I’ll be honest, before I tried them, I was a little skeptical. It’s started to become fairly natural for me to turn down anything resembling a wheat product, but I gave these a taste, and my goodness, they’re YUM! So addictive!

    Paleo Onion and Sesame Almond Crackers
    Loosely based on a recipe by Life As A Plate

    Makes: 25    Takes: 35-45Mins

    Ingredients:
    2 cups Almond meal
    3 Tbsp onion powder
    1 tsp garlic salt
    2 Tbsp sesame seeds
    3 Tbsp olive oil
    1 egg, beaten

    • place all dry ingredients in a bowl, mix until well combined
    • pour beaten egg and olive oil into dry ingredients
    • stir until the mixture has formed an even dough
    • form a ball, and place onto greaseproof paper, flatten gently
    • place another piece of greaseproof paper on top, roll out until desired thickness, about 2mm
    • cut into a grid of squares or rectangles – leave together (they will break apart easily once baked)
    • place whole sheet onto a baking tray, and bake at 160 C/320 F for 20-25mins. until lightly browned and crisp
    • cool on a wire rack, and break apart crackers once cool

    I’m quite keen on trying these out with half walnut flour as suggested in the original recipe. I’m sure it will give the cracker a pleasant nuttier taste.

    I’m also quite tempted to play around with flavouring.

    Maybe using a generous measure of freshly ground black pepper in place of the onion powder to make black pepper crackers… or using a higher ratio of sesame seeds to really highlight their deliciousness. I shall have to experiment with these, because they really are quite yummy!

    As is, these crackers are VERY pleasant… maybe even too pleasant considering how addictive they are!

    So I would highly recommend giving them a go, but be warned!

    The combination of the onion/garlicky crackers with the super garlicky tzatziki was awesome! Just don’t expect to get very intimate with anyone after eating this!


  5. I’m back… with Vegetable Crisps (chips)

    March 6, 2012 by Tali

    It feels like I’ve not blogged in a VERY long time. Because, well… I’ve not.

    I got very sick at the beginning of last week which left me bed-bound for a few days and then I found myself struggling to get back into the swing of things.

    It was particularly frustrating as I was only 1 week into my 4 week 100% Primal challenge. I had been eating so well and I got sick! How cruel!

    Trying to keep to Primal guidelines while in bed and unable to physically move is tough. Particularly when your parents don’t fully appreciate or comprehend what eating Primal actually entails… I managed… somehow. Thankfully Mo came over and made me some chicken soup on Wednesday evening and (as chicken soup is known for doing so) I found I had made a miraculous recovery upon waking Thursday morning. I felt like a completely different person!

    But this overly long break from blogging and the real world left me feeling somewhat lost and unsure of where to pick myself up again. Mo suggested we spend the weekend immersed in cooking and trying out recipes we’d been gawking over for a while.

    A brilliant idea in theory!

    In practice, it left me with an over-whelming number of items I wanted to blog about and share with all of you.

    This is:
    a) a little daunting
    b) giving me a back-log of items I need to photograph
    c) delicious!

    The photographic element to this blog is really important to me. In my opinion, great food porn photos can really make a website. I personally take pleasure in drooling over other peoples’ excellent food photography, and so that is something I strive to achieve. It’s all a little new to me, and so setting up my shots takes time, and I’m often very restricted by the time of day and particularly the amount of natural light in my house.

    By the end of the weekend I had 6 or 7 recipes I wanted to share with you all.

    Crazy – I know!

    I’m going to split these all up over a few days, for my own sanity and also – to (hopefully) keep you coming back for more!

    Let’s start off with vegetable crisps – or chips as you Americans and South Africans like to call them!

    I feel I should mention I’m not a massive fan of the potato chip. I might have one or two if they were in a bowl at a party – but I never specifically go for them, I’m more of a sweet-snack kinda gal.

    Root vegetable chips on the other hand… well, that is a different story! These are always a welcome, albeit rare, treat, not widely available and pretty pricey when they are. What could be more exciting than crisps/chips in a gorgeous array of colours, made from delicious vegetables such as beetroot, carrots, parsnips and sweet potato!?

    Mo and I decided we wanted to make our own! We actually attempted a batch of parsnip crisps at his place a while ago, and they didn’t turn out exactly as planned…

    So this was our second attempt – which also involved some other veggies.

    First we had to buy a mandoline. You’ll need one of these in order to get those nice super thin and even slices.

    We then set to work making the chips/crisps.

    Vegetable Crisps

    Makes: lots  Time: 1hr plus

    Ingredients
    2 Large Parsnips
    2 Large carrots
    1/2 Butternut squash
    2 Beetroots
    Olive oil
    Salt

    • pre-heat oven to 170-180 C / 340-350 F
    • starting with the lightest colour vegetable – parsnip in this case, (your mandolin will get stained and if you start with the beets, then your other veg will get stained pink). Slice at an angle on the thinnest blade option, attempting to get the largest sized slices possible.
    • using paper towel, dry off as much moisture as possible from the slices. (this is a point I’ve found most recipes fail to mention)
    • place your dried slices in a bowl, pour in 1-2 tablespoons of olive oil, and 1/8 teaspoon salt, mix until all slices are fully coated.
    • lay slices out onto lined baking sheets and place in oven. they should take  7-10mins to cook, watch them carefully! They are prone to burning easily. They may need to be turned half-way through.
    • once ready, transfer the vegetable chips to a cooling rack.
    • repeat the above procedure for all over veggies. Once all baked, crisped and cooled – Eat and enjoy! 
    • store in an airtight container.

    These can be enjoyed as a side dish to some tasty meat or fish. Or treat yourself and your guests for an occasional snack with pre-dinner drinks.

    Go crazy and try this with any vegetable you like – I would suggest sticking to low water content veggies!

    Maybe whip up a tasty dip to serve along side these, like some baba ganouch or tzatziki?


  6. Paleo Granola

    January 26, 2012 by Tali

    This is my recipe for Paleo/Primal/Gluten-free/wheat-free/dairy-free… trying to think of more…can’t…..Tasty Granola!

    I have started trying to eat a more primal diet. Staying away from processed foods as well as wheat, grains, pulses, and trying to limit my intake of high sugar foods.

    Primal diets largely consist of meat, poultry, fish, vegetables, fruits, nuts and seeds. It is these nuts and seeds play a big part in this post! Just think what caveman would have available to him, add in some modern cooking methods and some imagination – and that is what we’re looking at!

    Breakfast on a primal diet can sometimes be tricky, especially when you need something fast and easy. ‘Regular’ people would grab a bowl of cereal pour on some milk, and off they go! But this isn’t so easy. Cereals contain grains, and are more often then not HIGHLY processed. completely ridding all of the ‘nutrition’ from the food product… cereal companies tend to add vitamins and nutrients back into the product artificially. Not sound so good to me!

    But… give up cereal!? Now you’re thinking ‘So, I’m going to have to change my entire morning schedule because I shouldn’t eat cereal!?’ Well… not necessarily!

    You can make your own!

    I tend to make a batch once a week or once every two weeks. It depends how much people nibble on it throughout the day, and how often I eat it for breakfast!

    Its pretty easy – you can use wherever nuts and seeds you would like. If you don’t like certain nuts, are allergic to them or can’t get hold of any leave them out! Use something else!

    I apologise in advance that this isn’t a ‘real’ recipe. It takes a little guess work and is subject to personal taste.

    This time I used:

    Paleo Granola

    150g shelled pistachio nuts
    200g slivered almonds
    150g cashew nuts
    100g sesame seeds
    50g sunflower seeds
    50g pumpkin seeds
    50g pine kernals/nuts
    100g unsweetened dessicated coconut
    25g pecan nuts (these were just lying around so I threw them in)

    1 1/2 Tblsp coconut oil
    honey/agave nectar

    Heat oven to 140-150 C.

    • Place all of your nuts and seeds into a big bowl. Warm your coconut oil and about 45g honey/agave nectar until it is runny. Pour coconut oil and honey/agave over the nuts and seeds, mix well.
    • Once it is all coated, pour mixture onto two lined baking trays. Spread out into even layers. Place in the oven.
    • After 10-15mins, check and gently move the parts that are starting to colour around the edges. Place back in the oven, swapping the trays for another 10-15mins. You will want to keep checking it from this point, it may need a little longer.
    • When the trays are a nice golden colours, take them out the oven, and leave on cooling racks to cool down.
    • Once cool break the pieces up and store in an airtight container.


    Before baking...

    ... after baking!

    Serve with yogurt (if your diet allows) & fruit. Maybe in a  bowl with milk?

    Great as a snack as it is! – My mom likes to do this… its the main reason I find myself wondering what happened to all that granola I just made!?

    But its fine, its healthy! So indulge!

    This is quite filling because of all the nuts and seeds, so bear that in mind when considering portion sizes!